Description
Mini Wings Polishing Flapper 1000 grit waterless
Magic Mini Wings Polishing Flapper: Waterless High-Efficiency Finishing
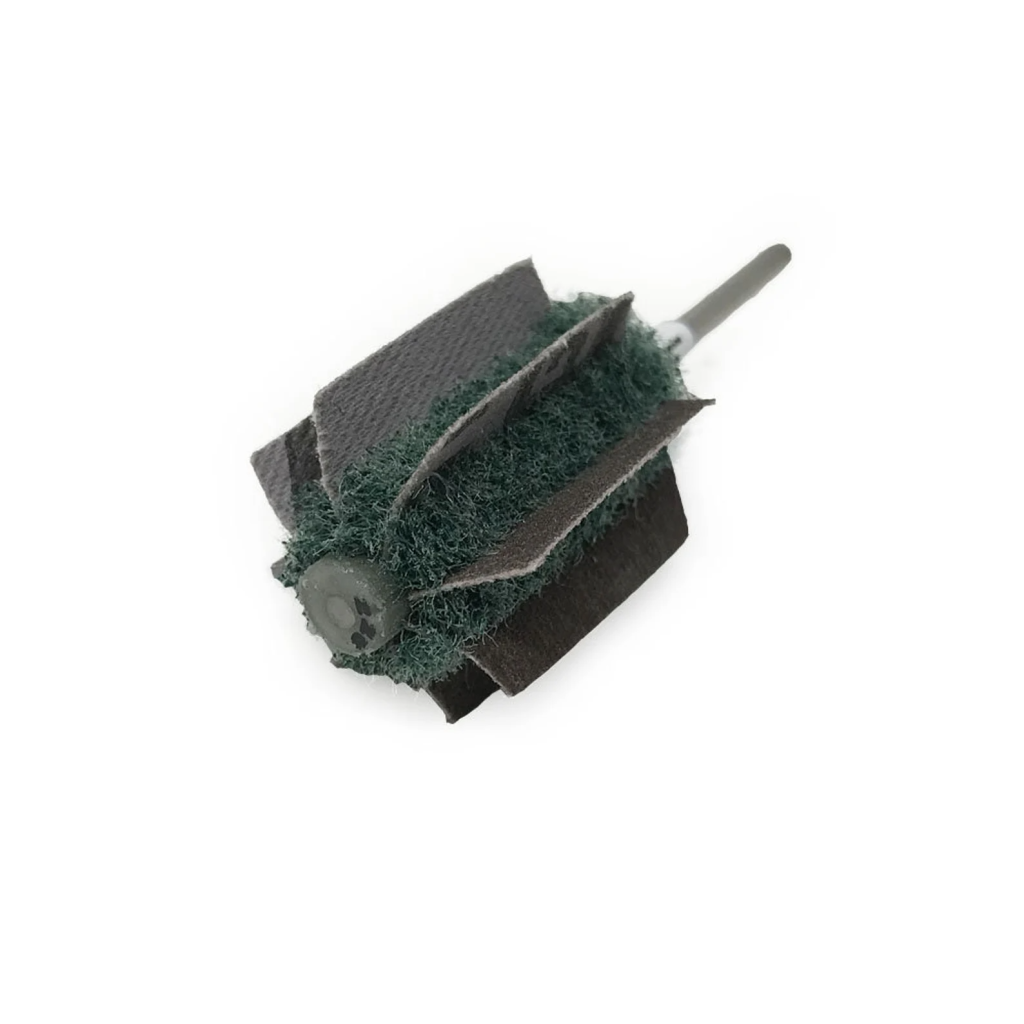
The Mini Wings Polishing Flapper 1000 grit waterless is a revolutionary precision abrasive tool designed for simultaneous cutting and smoothing of intricate surfaces. Engineered for hard-to-reach areas, these “Mini Wings” utilize a unique 45-degree angled cloth flap design to provide a consistent, high-luster finish without the need for water or traditional polishing compounds.
Whether you are finishing the internal diameter of a ring or detailing industrial cavities, the Mini Wings adapt to various diameters to significantly reduce total processing time.
Technical Specifications: 1000 Grit “Mini Wings” Series
The 1000 Grit variant is specifically formulated for the final stages of surface refinement, transitioning a smooth satin finish into a brilliant shine.
| Feature | Specification | Industrial & Creative Benefit |
| Grit Grade | 1000 Grit (Super Fine) | Ideal for final smoothing, deburring, and high-gloss prep. |
| Core Material | Unitized Fiber Core | Provides a “sponge-like” flexibility to conform to contours. |
| Flap Material | Impregnated Aluminum Oxide | High-quality abrasive that cuts and polishes in one step. |
| Shank Size | 3/32” (2.35 mm) | Standard fit for flex shafts, micromotors, and Dremels. |
| Operating Speed | Max 5,000 RPM | Optimized for low-speed control to prevent heat buildup. |
| Dimensions | 1″ Diameter (Compressible) | Compresses to 0.5″ during use to fit tight apertures. |
Key Performance Advantages
Dry Polishing Technology: These wheels are designed to be used “as is,” eliminating the mess of water or polishing pastes while maintaining surface purity.
Contour Adaptation: The flexible flaps and unitized fiber core allow the tool to move seamlessly around irregular shapes without flat-spotting.
One-Step Efficiency: Simultaneously removes fine scratches while brightening the metal, reducing the number of tool changes required.
Material Versatility: Highly effective on all precious metals (gold, silver, platinum), as well as stainless steel, aluminum, wood, and cast resin.
Multi-Industry Applications
Jewelry Fabrication: Specialized for polishing the inner curves of rings, cuffs, and bangles.
Automotive Detailing: Perfect for cleaning and polishing intake/exhaust ports, tubular frames, and engine cylinders.
Industrial Machining: Used for deburring and finishing internal cavities on precision parts that are otherwise inaccessible.
Woodworking & Hobby: Refines carved wood to an incredible luster and polishes hybrid resin/wood rings to a mirror shine.
Complete Magic Mini Flapper Ecosystem
For professional results, the 1000 Grit Mini Wing is often part of a graded sequence used to take a raw surface to a master-class finish.
| Stage | Grit | Goal |
| Stage 1 | 220 / 320 | Heavy sanding; removing casting marks and deep scratches. |
| Stage 2 | 800 | Medium smoothing; creating a silky matte or satin base. |
| Stage 3 | 1000 / 1200 | High-refinement; erases all previous grain lines. |
| Stage 4 | 1500 / Pink Magic | Final brilliant shine; mirror-like reflection. |
Operational Guidelines
Speed Control: Run at a slow speed (5,000 RPM or less) to maximize the life of the tool and ensure the best finish.
Pressure Modulation: Apply light pressure to allow the “wings” to fan out and adapt to the internal contour.
Avoid Contamination: Do not use the same wheel for different metals to prevent cross-contamination that could mar a final polish.
Jeweler’s SOP: Internal Ring Polishing with Magic Mini Flappers
This Standard Operating Procedure (SOP) outlines the workflow for achieving a flawless, mirror-like internal finish on rings and bands using the Magic Mini Flapper system. By following this sequential grit progression, you ensure the removal of all casting defects and the development of a deep, distortion-free luster.
Phase 1: Preparation and Safety
Inspection: Examine the ring interior for deep casting pits or sprue remnants.
Safety Gear: Ensure the use of eye protection and a vacuum dust extractor to manage fine metal and abrasive particulates.
Tool Setup: Mount the appropriate Magic Mini Flapper onto a 3/32” (2.35 mm) shank handpiece or micromotor.
Speed Setting: Set the tool rotation between 3,000 and 5,000 RPM; exceeding this can cause premature wear and excessive heat.
Phase 2: The Polishing Sequence
Follow the grit progression below. Important: Always clean the ring thoroughly between steps to prevent coarse grit from contaminating the finer stages.
Step 1: Initial Leveling (220 – 320 Grit)
Action: Insert the flapper into the ring and apply light, consistent pressure.
Goal: Level the surface and remove coarse scratches or casting skin.
Visual Check: The interior should have a uniform, matte gray appearance.
Step 2: Smoothing and Satin Finish (800 Grit)
Action: Use a “sweeping” motion back and forth through the ring.
Goal: Erase the 320-grit scratch pattern and create a silky-smooth satin base.
Visual Check: The surface should begin to show soft light diffusion.
Step 3: High Refinement (1000 Grit “Mini Wings”)
Action: Utilize the 45-degree angled flaps to reach the very edges of the ring interior.
Goal: Use this “waterless” step to refine the surface to a pre-polish state without additional compounds.
Visual Check: No visible scratches should remain; the metal should look hazy but bright.
Step 4: Final Mirror Luster (1500 Grit / Pink Magic)
Action: Use the lightest possible “feathering” touch.
Goal: Achieve the final “Ultra Shine” and maximum depth of reflection.
Visual Check: A true “black mirror” reflection with zero distortion.
Troubleshooting and Pro-Tips
| Issue | Cause | Solution |
| Visible Scratches | Skipped a grit or contamination | Go back one grit level and ensure thorough cleaning between steps. |
| Metal Overheating | RPM too high or too much pressure | Reduce speed to < 5,000 RPM and let the flaps do the work. |
| Uneven Finish | Holding tool in one spot too long | Keep the ring or the tool moving constantly to ensure uniform coverage. |
| Premature Flapper Wear | Forcing the tool into a too-small gap | Allow the 1″ diameter to compress naturally to 0.5″ without force. |
Post-Processing
Ultrasonic Cleaning: Place the finished ring in an ultrasonic cleaner to remove any microscopic abrasive residue.
Final Steam: Use a steam cleaner for a final spot-free brilliant finish.